
After you load a simulation from the Home Screen, Studio opens the simulation workspace. This page maps the default layout. Playback controls are covered in Running a Simulation, and each panel links to a more detailed guide below.
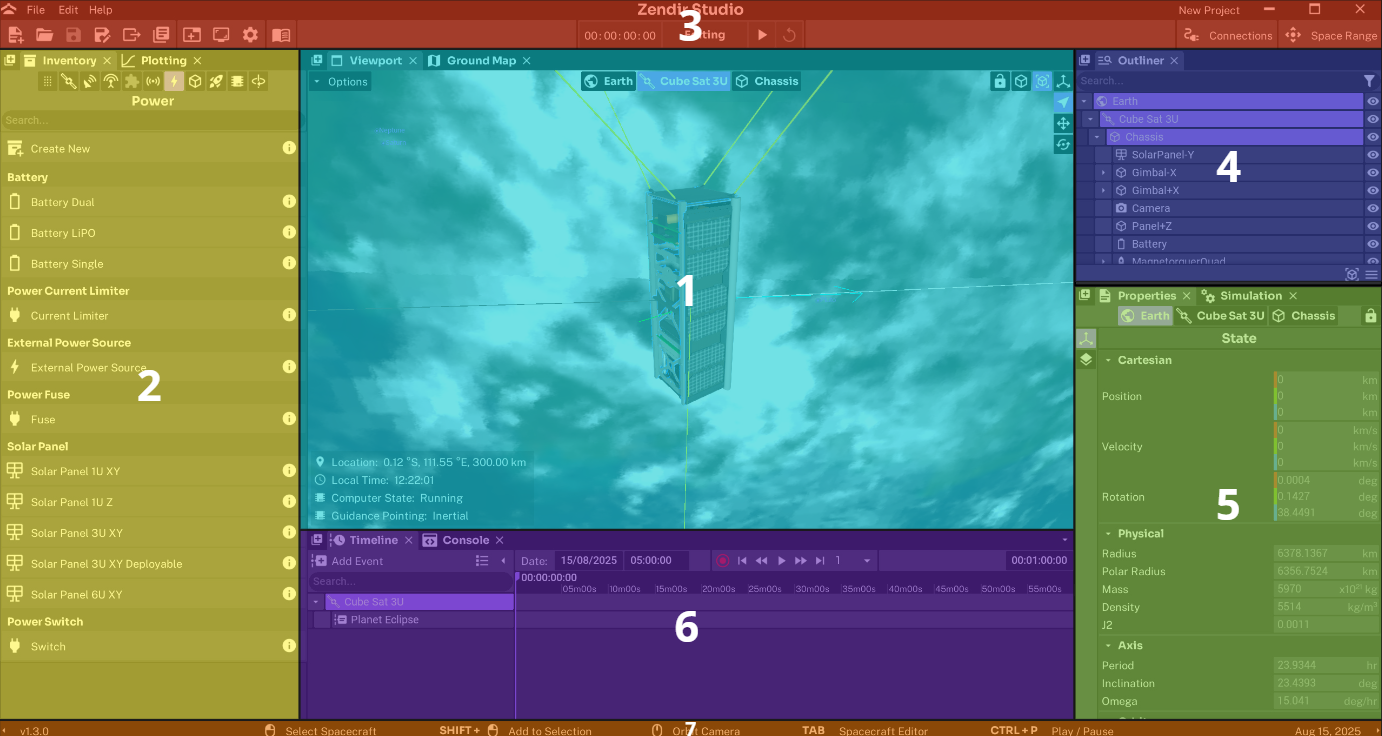
The default layout has seven front-facing areas. The bottom center section stacks the Timeline Panel and the Console Panel as tabs. Extra panels can be added with the + control on a section’s tab bar. See Adding Panels for moving, splitting, and saving the layout.
Viewing the Viewport
The Viewport Panel is the 3D view of the simulation. Select it, then orbit, zoom, and move the observer:
| Input | Action |
|---|---|
| Right-click drag | Orbit around the current target |
| Scroll wheel | Zoom in or out |
| W / S, A / D, Q / E | Move the observer |
| TAB | Switch the target between the planet and the spacecraft |
The breadcrumb at the top of the Viewport Panel also switches the target. In a Library example, press TAB to focus on the spacecraft and inspect its components.
Using the Inventory
The Inventory Panel is where you add entities and hardware. When a planet is in focus, it lists spacecraft and ground stations. When a spacecraft is in focus, it lists components grouped by type.
Library simulations already contain configured spacecraft and components. You do not need to add hardware before running one. Use the Inventory Panel when starting a blank simulation, as shown in Spacecraft Simulation.
NOTE
A spacecraft needs a chassis before other components can attach. The chassis category is shown first on a new spacecraft.
Reading the Toolbar
The Toolbar Panel is the top bar of the workspace. It stays visible for the whole session.
File actions such as save appear on the left. The simulation clock and the play, pause, and reset controls appear in the center. Hover over a control to see its tooltip.
Selecting in the Outliner
The Outliner Panel lists every object in the simulation, nested under the body it orbits. Select a row to inspect that object. Select the eye icon to hide it in the Viewport Panel without removing it from the simulation.
Editing Properties
The Properties Panel shows information about the selected object. Its tabs change with the selection.
On a spacecraft, typical tabs include:
State: orbit, attitude, and attitude rateData: mass, models, variables, and messagesConstellation: constellation membership, when usedEvents: events on the spacecraft and its components
On a component, State is the local transform and mass. Data holds variables, models, and messages.
Properties are editable only while the simulation is reset. After you play or pause, most fields remain locked until you reset. See Running a Simulation.
Reading the Timeline
The Timeline Panel shows simulation time, playback speed, and events. Each spacecraft has a row. Access, eclipse, and custom events appear as bars on that row.
Use this panel to change speed and to scrub history while paused. Those steps are in Running a Simulation.
Reading the Console
The Console Panel is usually a second tab next to the Timeline Panel. It lists live logs from the simulation and from Studio. Filter by type, search the message text, and copy or clear the list as needed.
Checking the Status Bar
The Status Bar is the bottom row of the window. It cannot be hidden. It shows the Studio version, keyboard hints, button tooltips, and event messages. It also opens the AI Chat Panel.
Adding More Panels
Select + on a section’s tab bar to add another panel, such as the Plotting Panel or the Ground Map Panel. Library examples often include plots already. Studio saves the panel layout with the simulation and restores it when the simulation is loaded again. The full steps are in Adding Panels.